Building the Freecodecamp 2nd Intermediate Front-end Project - A Weather App.
This project is part of HowToCoder weekly project series.
Checkout the last post if you haven’t read Building Freecodecamp Random Quote Machine.
Show the local weather app
The weather app will be a single page app. The user stories are as follows:
- I can see the weather in my current location.
- I can see a different icon (e.g. snowy mountain, hot desert, cloudy, rainy) depending on the weather.
- I can push a button to toggle between Fahrenheit and Celsius.
How will it look like after the completion of this project?
flow of app or how the app will work?
[app] -> making call to location api (Geoip db API).
[app] <- got the json response from the location api. now we got the user latitude and longitude.
[app] -> making call to weather api passing the lat long in the request body.
[app] <- got the json response from weather api and rendered it in html.
Prerequisites?
Basics of Bootstrap but not mandatory.
Basics of Jquery ajax but i am gonna explain anyway.
Git bash shell installed. If not then install it from here
Don’t worry if you don’t know Bootstrap, it’s a css framework, you can use plain css for styling if you want.
So let’s start building it.
Project Setup
Directory Structure
--css/
----style.css
--img/
----weather.jpg
--js/
----script.js
index.html
index.html
Open index.html and paste the following code.
<!DOCTYPE html>
<html lang="en">
<head>
  <meta charset="UTF-8">
  <title>Weather App</title>
  <link href='https://fonts.googleapis.com/css?family=Slabo+27px' rel='stylesheet' type='text/css'>
  <!-- bootstrap css cdn -->
  <link rel="stylesheet" href="https://maxcdn.bootstrapcdn.com/bootstrap/3.3.5/css/bootstrap.min.css">
  <!-- screen.css file -->
  <link rel="stylesheet" href="./css/screen.css">
  <!-- jquery and bootstrap js files cdn -->
  <script src="https://ajax.googleapis.com/ajax/libs/jquery/1.11.3/jquery.min.js"></script>
  <script src="https://maxcdn.bootstrapcdn.com/bootstrap/3.3.6/js/bootstrap.min.js"
  integrity="sha384-0mSbJDEHialfmuBBQP6A4Qrprq5OVfW37PRR3j5ELqxss1yVqOtnepnHVP9aJ7xS"
  crossorigin="anonymous"></script>
</head>
<body>
  <div class="container">
    <div id="heading">
      <h1 class="text-center">Weather app</h1>
    </div>
  </div>
  <script src="./js/script.js"></script>
</body>
</html>
Above code is basic skeleton of an html page. I have included all the required css and js files inside the head tag.
And include the script.js file at the end of closing body tag.
I have added a center aligned heading as Weather App.
The Weather app will show the temperature, city, country, an image based on the weather like a cloudy, rain or picture of sun for sunny day.
And a toggle button to toggle the temperature from degree celsius to fahrenheit and vice versa.
Let’s add these things:
<!-- inside the div class container -->
<div class="container">
  <div id="heading">
    <h1 class="text-center">Weather app</h1>
  </div>
  <div class="row">
    <div class="col-md-6 col-xs-8 col-xs-push-2 col-md-push-3">
      <div class="weather text-center">
        <h2 class="temp"></h2>
        <h3><span class="city"></span>, <span class="country"></span></h3>
        <div class="iconpic">
          <img src="" class='img img-responsive center-block'>
        </div>
        <h4 class="weatherDetail"></h4>
        <div class="toggle" id="c">
          <button type="button" class="btn btn-danger btn-lg">Toggle temperature</button>
        </div>
      </div><!--weather-->
    </div>
  </div><!--row-->
  <br/>
  <p class="text-center">by <a href="http://howtocoder.com" target="_blank">HowToCoder</a></p>
</div>
<script src="./js/script.js"></script>
In above code i added two span inside an h3 tag with class as city and country.
These 2 span will be populated with city and country of the user respectively.
The div with class iconpic has an img tag with src="" and this too will be populated with an img src from the response from Weather API.
In the last i added a div with class toggle and id as c.
The class btn, btn-lg, btn-danger are the bootstrap classes for the Buttons.
Let’s open the index.html page in web browser. You will see following output.
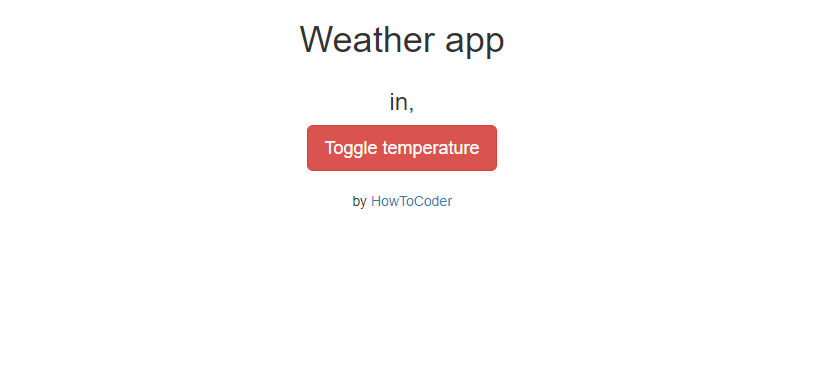
Time to add some css in css/screen.css file.
css/screen.css
body {
  background: url('../img/weather.jpg');
  background-size: cover;
}

#heading {
  font-family: 'Slabo 27px', serif;
}

.weather {
  background-color: rgba(236, 240, 241, 0.8);
  padding: 35px 0px;
  border-radius: 5px;
}

.weather .temp {
  margin-top: 0px;
}

.weather .iconpic img {
  min-width: 150px;
  min-height: 150px;
}

a{
  text-decoration: underline;
  color: inherit;
}
After adding the css it will look something like this.

So it’s not showing any weather details right now because we are not making any api calls.
Time to write javascript code to make ajax calls to APIs.
The first API call will be to get the latitude and longitude of the user so that that can be sent to weather api to get the current weather information.
To get the lat long of the user, I am using an ip based API instead of using the html5 geolocation.
Because HTML5 geolocation always shows a popup to users to allow the user to give his location and many times people do click on do not allow and that can break the app.
I will be using 2 APIs for this weather app project.
-
Geoip db - to get latitude & longitude and it doesn’t require any API key.
-
Open Weather Map - to get weather details by passing lat long result from json response of geoip API.
You can get your own API Key for Open Weather Map API on :
Go to Open Weather Map API and select and subscribe the current weather data API.
Choose the free plan and click “Get API key and Start” and signup to get API keys.
See the documentation for this API here.
We will be calling the API by passing the geographic coordinates of User.
So let’s add the javascript code:
js/script.js
$(document).ready(function() {
  var fahrenheit, celsius;
  var weatherApiUrl="https://api.openweathermap.org/data/2.5/weather";
  var apiKey = "b25ca364bc04acd2ca3e3aa725eb7097"; //<weather-api-keys>
  getLatLong();
});
In above code I declared 2 variables one weatherApiUrl and other apiKey for the open weather API.
The function getLatLong will make a call to geoip db api to get user’s location.
Let’s add the getLatLong function:
$(document).ready(function() {
  var fahrenheit, celsius;
  var weatherApiUrl="https://api.openweathermap.org/data/2.5/weather";
  var apiKey = "b25ca364bc04acd2ca3e3aa725eb7097"; //<weather-api-keys>
  getLatLong();

  /* function to get user's location */
  function getLatLong(){
    $.ajax({
      url: "https://geoip-db.com/json/",
      type: 'GET',
      dataType: 'json',
      success: function(data){
        var lat = ;
        var long = data.longitude;
        $('.city').html(data.city);
        $('.country').html(data.country_name);
        weatherApiUrl += "?lat="+lat+"&lon="+long+"&APPID="+apiKey+"&units=metric";
        getWeatherData();
      },
      error: function(err) {
        alert('Oops something went wrong, Please try again.');
        console.log(err);
      }
    });
  }
});
This $.ajax() function takes an object containing following properties:
- url - the url of the api end point.
- type - the type of call like get or post etc.
- dataType - data that you expect to receive from the ajax call
- success - a function which gets called when the ajax call successfully returns the response
- error - a function which gets called in case of any errors in ajax call.
The above function calls the geoip-db api and json response is as follows:
{
  "country_code":"IN",
  "country_name":"India",
  "city":"Mumbai",
  "postal":null,
  "latitude":18.975,
  "longitude":72.8258,
  "IPv4":"27.4.21.136",
  "state":"Maharashtra"
}
The latitude and longitude is accessed using data.latitude and data.longitude.
The code $('.city').html(data.city); updates the innerHtml property of DOM element having class .city and same way the country is updated in DOM.
Once you got lat long and updated the city and country then you update the weatherApiUrl by concatenating the lat long and API key in the url.
And then we call the getWeatherData() function to call weather API.
Let’s add the getWeatherData() function in js code.
$(document).ready(function() {
var fahrenheit, celsius;
var weatherApiUrl="https://api.openweathermap.org/data/2.5/weather";
var apiKey = "b25ca364bc04acd2ca3e3aa725eb7097"; //<weather-api-keys>
getLatLong();
/* function to get user's location */
function getLatLong(){
$.ajax({
url: "https://geoip-db.com/json/",
type: 'GET',
dataType: 'json',
success: function(data){
var lat = ;
var long = data.longitude;
$('.city').html(data.city);
$('.country').html(data.country_name);
weatherApiUrl += "?lat="+lat+"&lon="+long+"&APPID="+apiKey+"&units=metric";
getWeatherData();
},
error: function(err) {
alert('Oops something went wrong, Please try again.');
console.log(err);
}
});
}
/* function to get weather data from the user's location */
function getWeatherData(){
$.ajax({
url: weatherApiUrl,
type: 'GET',
dataType: 'json',
success: function(data) {
var temprature=data.main.temp;
celsius=temprature;
fahrenheit=celsius*1.8+32;
var icon=data.weather[0].icon;
var weatherDetail=data.weather[0].main+", "+data.weather[0].description;
$('.weatherDetail').html(weatherDetail); //update weather description in html
$('.iconpic>img').attr('src','http://openweathermap.org/img/w/'+icon+'.png'); //update the icon based on weather
$('.temp').html(temprature+"℃"); //update the temprature
},
error: function(err) {
alert('Oops something went wrong, Please try again.');
console.log(err);
}
});
}
});
This function makes ajax call to weather API and gives temperature and weather description in the json response.
API call:
api.openweathermap.org/data/2.5/weather?lat={lat}&lon={lon}
Parameters:
lat, lon coordinates of the location of your interest
Examples of API calls:
api.openweathermap.org/data/2.5/weather?lat=35&lon=139
API response:
{
  "coord":{"lon":-122.09,"lat":37.39},
  "sys":{"type":3,"id":168940,"message":0.0297,"country":"US","sunrise":1427723751,"sunset":1427768967},
  "weather":[{"id":800,"main":"Clear","description":"Sky is Clear","icon":"01n"}],
  "base":"stations",
  "main":{"temp":285.68,"humidity":74,"pressure":1016.8,"temp_min":284.82,"temp_max":286.48},
  "wind":{"speed":0.96,"deg":285.001},
  "clouds":{"all":0},
  "dt":1427700245,
  "id":0,
  "name":"Mountain View",
  "cod":200
}
We update weather description details, temperature & icon image with the response data.
Now you will be able to see the weather app working correctly.
You should see temperature, city, country, an image representing current weather, a weather description text.
Right now if you click on the Toggle temperature button, it won’t work because we hacen’t added the code for toggle temperature from celsius to fahrenheit and vice versa.
Let’s add the code to toggle temperature.
$(document).ready(function() {
var fahrenheit, celsius;
var weatherApiUrl="https://api.openweathermap.org/data/2.5/weather";
var apiKey = "b25ca364bc04acd2ca3e3aa725eb7097"; //<weather-api-keys>
getLatLong();
/* function to get user's location */
function getLatLong(){
$.ajax({
url: "https://geoip-db.com/json/",
type: 'GET',
dataType: 'json',
success: function(data){
var lat = ;
var long = data.longitude;
$('.city').html(data.city);
$('.country').html(data.country_name);
weatherApiUrl += "?lat="+lat+"&lon="+long+"&APPID="+apiKey+"&units=metric";
getWeatherData();
},
error: function(err) {
alert('Oops something went wrong, Please try again.');
console.log(err);
}
});
}
/* function to get weather data from the user's location */
function getWeatherData(){
$.ajax({
url: weatherApiUrl,
type: 'GET',
dataType: 'json',
success: function(data) {
var temprature=data.main.temp;
celsius=temprature;
fahrenheit=celsius*1.8+32;
var icon=data.weather[0].icon;
var weatherDetail=data.weather[0].main+", "+data.weather[0].description;
$('.weatherDetail').html(weatherDetail); //update weather description in html
$('.iconpic>img').attr('src','http://openweathermap.org/img/w/'+icon+'.png'); //update the icon based on weather
$('.temp').html(temprature+"℃"); //update the temprature
},
error: function(err) {
alert('Oops something went wrong, Please try again.');
console.log(err);
}
});
}
/* code to toggle between celsius and fahrenheit */
/* adding a click event listener on the toggle button */
$('.toggle .btn').click(function(){
// if the div has attribute id as c then convert temperature to fahrenheit
if($('.toggle').attr('id')=='c'){
$('.temp').html(fahrenheit+"℉");
$('.toggle').attr('id','f');
}
else if($('.toggle').attr('id')=='f'){
//else if div has attribute id as f than convert temperature to celsius
$('.temp').html(celsius+"℃");
$('.toggle').attr('id','c');
}
});
});
In above code I added a click event listener on button element having class as btn.
whenever you click on toggle button it will check whether div with class toggle has attribute id as f or c?.
If the attribute id is ‘c’ then current temperature shown is in celsius and convert it to fahrenheit.
And if the attribute id is ‘f’ that means the current temperature shown is in fahrenheit and we need to update it with celsius.
Initially it will be in celsius with id as ‘c’.
Now go ahead and refresh the browser page and click on toggle button and you will see the temperature changing from celsius to fahrenheit and fahrenheit to celsius.
And it will look like this:
Congratulations you successfully completed the Freecodecamp Show Local Weather App Project.
Well not really :/
We still need to push our code to github and deploy our project on github pages.
Let’s do it then.
Deployment
If you have done the Random Quote Machine app then you know this step very well and how to do it.
Let’s Push your code to Github
Now time to push the code to github repo. Go to github and create a new repository.
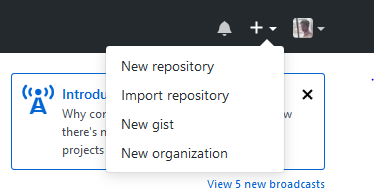
Fill up repository name and description. And click on “Create repository” button.
Copy the repository url. It will be https://github.com/<your-username>/<Repository-name>.git.
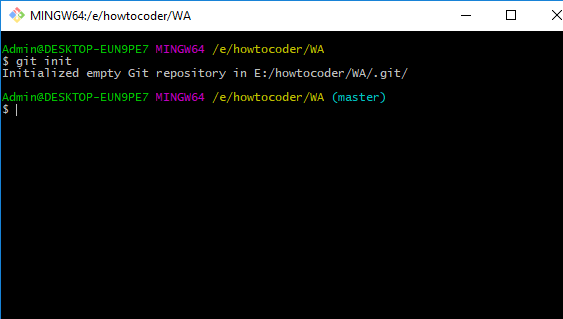
Now open git shell and navigate to your project folder. And type git init in github shell.
This command initializes the Directory as the repository. And you are now on the master branch of the repository.
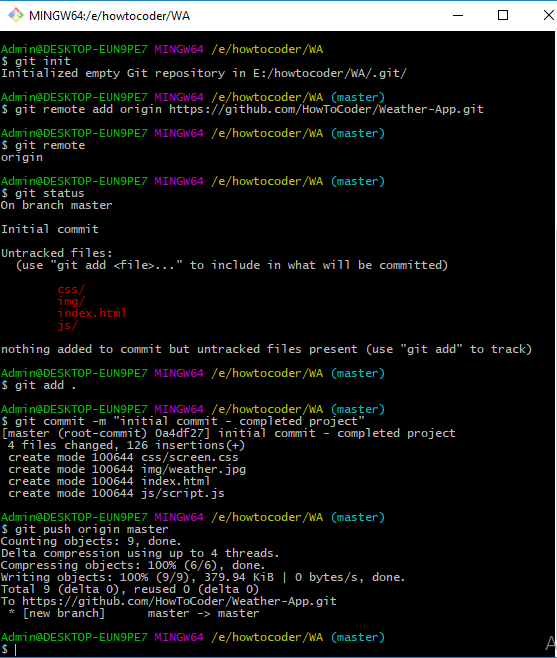
Now you need to add a remote as your github repository. A remote is where code will be stored i.e the one you above copied.
Type git remote add origin https://github.com/user/repo.git.
Now type git status and it will show the untracked files.
You need to add these files and commit the changes.
Type git add . and it will add all untracked files, so time to commit the changes.
Type git commit -m "initial commit - completed project"
You have committed the files and now push it to the remote.
Type git push origin master. This command pushes the the code on the master branch to the remote named origin.
Now navigate to your repository on github and you can see your files there.
Let’s make it live on github pages
Go to Settings tab on your project repo page, scroll down to Github Pages section.
Select the source as your master branch and click save.

And as you click save you will see a message saying Your site is ready to be published at http://<user>.github.io/<project-name>.
And also click on the “Enforce https” to make your site available on https.
Now you can visit that url and see your project live. Yay :)
It’s live & up and running. Good job.
Did you just say running?
Conclusion
-
You successfully completed the Freecodecamp Show Local Weather project.
-
You learned about how Ajax and APIs work. You used 2 APIs in this project.
-
You learned how to push your code to Github.
-
And how to deploy your project to github pages.
If you have any doubts or questions, write in the comments. I would love to help.
Stay tuned for the next tutorial.
And check out the last post if you haven’t read on Building Freecodecamp Random Quote Machine.
Did you find this article useful? Write your comments below.
If you found this article helpful, do share with your friends.
Let’s learn to code together. Thank you :)