Building the Freecodecamp 3rd Intermediate Front-end Project - A Wikipedia Viewer App.
This project is part of HowToCoder weekly project series.
Checkout the previous posts if you haven’t read
I am publishing this article before the schedule i.e Monday 11th Dec because I completed it early and I thought why to wait till Monday so here it is.
Let’s start!
Wikipedia Viewer app
The user stories are as follows:
- I can search Wikipedia entries in a search box and see the resulting Wikipedia entries.
- I can click a button to see a random Wikipedia entry.
Hints:
- Here’s a URL you can use to get a random Wikipedia article:
https://en.wikipedia.org/wiki/Special:Random - Here’s an entry on using Wikipedia’s API:
https://www.mediawiki.org/wiki/API:Main_page
You can visit the entry page of API and read about the documentation.
I already read the documentation and following is the url endpoint for search api and get result pages.
https://en.wikipedia.org/w/api.php?format=json&action=query&generator=search&prop=pageimages|extracts&pilimit=max&exintro&explaintext&exsentences=1&exlimit=max&gsrsearch={q}&&callback=?
How will it look like after the completion of this project?
flow of app or how the app will work?
[app] -> making call to wikipedia api (mediawiki API).
[app] <- got the json response from the wikipedia api. And then iterate through the array of result response and display them in html.
Prerequisites?
Basics of Bootstrap but not mandatory.
Basics of Jquery ajax but i am gonna explain anyway.
Git bash shell installed. If not then install it from here
Don’t worry if you don’t know Bootstrap, it’s a css framework, you can use plain css for styling if you want.
So let’s start building it.
Project Setup
Directory Structure
--css/
----screen.css
--js/
----script.js
index.html
index.html
Open index.html and paste the following code.
<!DOCTYPE html>
<html lang="en">
<head>
  <meta charset="UTF-8">
  <title>Wikipedia Viewer App</title>
  <link href='https://fonts.googleapis.com/css?family=Slabo+27px' rel='stylesheet' type='text/css'>
  <link rel="stylesheet" href="https://maxcdn.bootstrapcdn.com/font-awesome/4.5.0/css/font-awesome.min.css">
  <!-- bootstrap css cdn -->
  <link rel="stylesheet" href="https://maxcdn.bootstrapcdn.com/bootstrap/3.3.5/css/bootstrap.min.css">
  <!-- screen.css file -->
  <link rel="stylesheet" href="./css/screen.css">
  <!-- jquery and bootstrap js files cdn -->
  <script src="https://ajax.googleapis.com/ajax/libs/jquery/1.11.3/jquery.min.js"></script>
</head>
<body>
  <div class="container-fluid">
    <div class="row" id="heading">
      <div class="col-md-6 col-md-push-3 col-xs-6 col-xs-push-3">
        <h1 class="text-center">The Wikipedia Viewer</h1>
      </div>
    </div>
  </div>
  <script src="./js/script.js"></script>
</body>
</html>
Above code is basic skeleton of an html page. I have included all the required css and js files inside the head tag.
And include the script.js file at the end of closing body tag.
I have added a center aligned heading with class text-center as “The Wikipedia Viewer”.
Let’s add a search bar and button to get random article.
And a placeholder div where all the search results will be populated.
<!-- inside body -->
<div class="container-fluid">
  <div class="row" id="heading">
    <div class="col-md-6 col-md-push-3 col-xs-6 col-xs-push-3">
      <h1 class="text-center">The Wikipedia Viewer</h1>
      <!-- continued here -->
      <div class="text-center" id="random">
        <a href="http://en.wikipedia.org/wiki/Special:Random" target="_blank">
          <h2>Random articles <i class="fa fa-random fa-lg"></i></h2>
        </a>
        <h2>OR</h2>
      </div>
      <!-- form for search input -->
      <form class="form" action="javascript:void(0);">
        <div class="input-group">
          <input type="text" name="query" id="query" class="form-control input-lg" placeholder="Search">
          <div class="input-group-addon btn" id="search">
            <i class="fa fa-search"></i>
          </div>
        </div>
      </form>
    </div>
  </div>
</div>
<!-- container div to render the search results from Wikipedia -->
<div class="container">
  <div id="res">
  </div>
</div>
<br>
<h5 class="text-center">by <a href="http://howtocoder.com" target="_blank">HowToCoder</a></h5>
I added a text-center aligned div with id as random.
The anchor link “Random articles” is pointing to the link mentioned in hints above to get random article from wikipedia.
The <i> tag with class fa fa-random fa-lg is an icon to show random by font-awesome.
Next I added a form with action="javascript:void(0);" , it means do nothing when form submitted.
It’s javascript way of saying not to call to any action when form submitted.
The input element has id as query and an fa-search class font-awesome icon added as input group addon to search input.
At the end we have a div with class container having a nested div with id res.
This container class div acts as a container for the nested div with id res.
All the search results that will come from Wikipedia API call will be iterated and populated inside the div with id res.
Now if you open index.html in your browser you will see following output.
It looks very simple right now, let’s add some css to it to make it look good.
Add following css to your css/screen.css file.
css/screen.css
body{
  background-color: rgba(218, 223, 225,1);
}
a, a:link, a:active, a:visited, a:hover{
  text-decoration: none;
}
input[type='text']{
  border: 3px solid rgba(1, 152, 117,0.8);
  height: 65px;
}
input[type='text']:focus{
  border: 3px solid rgba(1, 152, 117,0.8);
}
.input-group-addon{
  margin: 0px;
  padding: 0px;
}
#heading{
  padding-bottom: 25px;
}
#heading h1{
  color: rgba(1, 152, 117,1);
}
#search{
  padding: 15px 35px;
  background-color: rgba(1, 152, 117,0.8);
  border: 3px;
}
#search i{
  font-size: 30px;
  color: rgba(238, 238, 238,0.8);
}
#random h2{
  margin: 0px;
  color: rgba(1, 152, 117,0.8);
}
#random i{
  padding: 12px 25px;
  border-radius: 10px;
  color: rgba(238, 238, 238,0.8);
  background-color: rgba(1, 152, 117,0.8);
}
#res{
  padding: 25px 0px;
}
#resultdiv{
  background-color: rgba(1, 152, 117,0.8);
  border-radius: 5px;
  margin: 25px auto;
  padding: 15px 30px;
}
#resultdiv a{
  color: rgba(255,255,255,0.9);
}
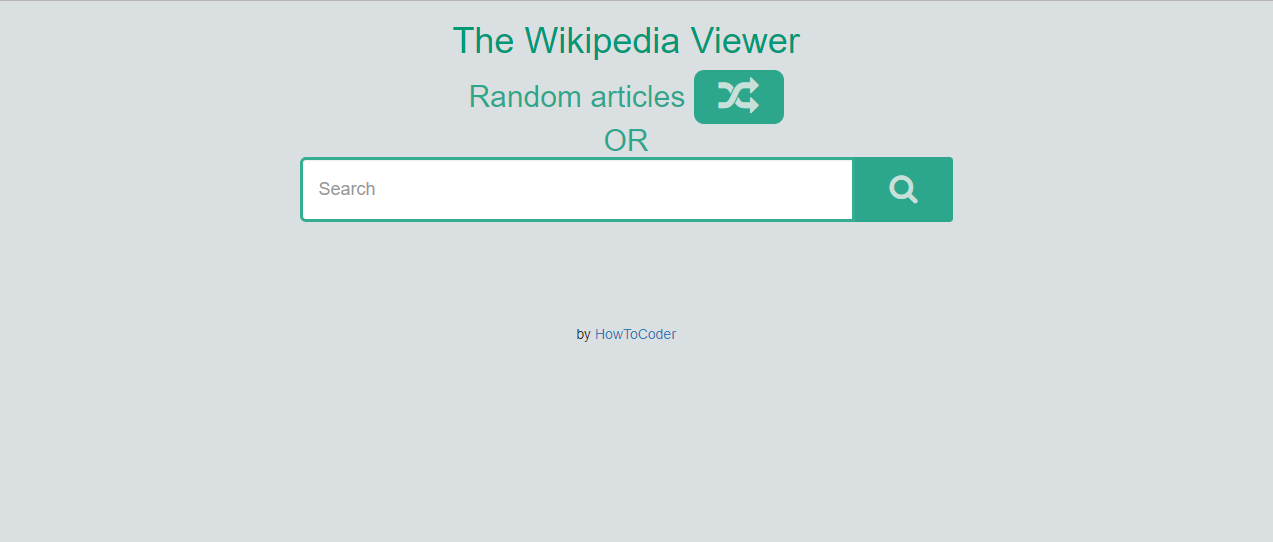
After adding the css go to your browser and refresh the index.html page.
You will see a beautiful Wikipedia Viewer App page as follows:
If you type something and search then nothing will happen as we haven’t added the javascript code to make call to Wikipedia API.
But you can click on the Random article button to get a random article from Wikipedia.
Give it a try. It will open a random article from Wikipedia in a new page.
Now let’s add the javascript code in js/script.js file.
This javascript code will call Wikipedia API on 2 events.
- When someone types something in search bar and hits enter.
- When someone types something and clicks on search.
js/script.js
$(document).ready(function() {
  /* when form is submitted */
  $('.form').submit(function(){
    $('#res').html(" "); // set innerHtml of res div as blank
    callWikipedia();
    return false;
  });
  /* when search button is clicked */
  $('#search').click(function(){
    $('#res').html(" ");
    callWikipedia();
  });
});
In above code I have added 2 event listeners, one on the submit event of the form and second on the click event on the search button.
The line $('#res').html(" "); sets the inner html of div with id res as blank every time the submit event happens to the new search results.
Otherwise if you search 1 query and after that 2nd query then the results of 2nd query will get appended at the end of the 1st search result.
So this line $('#res').html(" "); avoids this problem as it sets result div to blank before each ajax call to Wikipedia API.
The callWikipedia() is a function which makes call to Wikipedia API by passing the search query.
API call:
https://en.wikipedia.org/w/api.php?format=json&action=query&generator=search&prop=pageimages|extracts&pilimit=max&exintro&explaintext&exsentences=1&exlimit=max&gsrsearch={q}&&callback=?
Parameters:
gsrsearch into url body. This is the query you type into search bar.
Examples of API calls:
https://en.wikipedia.org/w/api.php?format=json&action=query&generator=search&prop=pageimages|extracts&pilimit=max&exintro&explaintext&exsentences=1&exlimit=max&gsrsearch=Artificial%20Intelligence&callback=?
API response:
{
  "batchcomplete": "",
  "continue": {
    "gsroffset": 10,
    "continue": "gsroffset||"
  },
  "query": {
    "pages": {
      "142224": {
        "pageid": 142224,
        "ns": 0,
        "title": "A.I. Artificial Intelligence",
        "index": 2,
        "thumbnail": {
          "source": "https://upload.wikimedia.org/wikipedia/en/thumb/e/e6/AI_Poster.jpg/33px-AI_Poster.jpg",
          "width": 33,
          "height": 50
        },
        "pageimage": "AI_Poster.jpg",
        "extract": "A.I. Artificial Intelligence, also known as A.I., is a 2001 American science fiction drama film directed by Steven Spielberg."
      },
      "15893057": {
        "pageid": 15893057,
        "ns": 0,
        "title": "Applications of artificial intelligence",
        "index": 3,
        "extract": "Artificial intelligence, defined as intelligence exhibited by machines, has many applications in today's society."
      }
    }
  },
  .
  .
  "limits": {
    "pageimages": 50,
    "extracts": 20
  }
}
Let’s add the callWikipedia() function in script.js file.
$(document).ready(function() {
  /* when form is submitted */
  $('.form').submit(function(){
    $('#res').html(" "); // set innerHtml of res div as blank
    callWikipedia();
    return false;
  });
  /* when search button is clicked */
  $('#search').click(function(){
    $('#res').html(" ");
    callWikipedia();
  });
  function callWikipedia(){
    var q = $('#query').val();
    var url = "http://en.wikipedia.org/w/api.php?format=json&action=query&generator=search&prop=pageimages|extracts&pilimit=max&exintro&explaintext&exsentences=1&exlimit=max&gsrsearch="+q+"&callback=?";
    $.ajax({
      url:url,
      type: 'POST',
      dataType: 'jsonp',
      success: function(result){
        var data = result.query.pages;
        alert(JSON.stringify(data));
        render(data);
      },
      error: function(err){
        console.log(err);
        alert('Oops something went wrong! Please try again.');
      }
    });
  }
});
In above callWikipedia function the variable q is assigned the search value that you type in the search bar as var q = $('#query').val();.
Then that search query is passed to Wikipedia API url as gsrsearch=q.
And then I am making Ajax call to Wikipedia API with that url variable as url, type as POST and dataType as jsonp.
In success function we get the API call response and we want to show the wikipedia pages for the searched query.
And we can access that using dot notation as result.query.pages.
You can see the response by just refreshing the index.html page and type something into search bar and click search button.
The code alert(JSON.stringify(data)); will show the result in an alert.
The JSON.stringify(data) function converts the data object into JSON string so that you can see them in alert.
data:{
  1164:{
    extract:"Artificial intelligence (AI, also machine intelligence, MI) is intelligence displayed by machines, in contrast with the natural intelligence (NI) displayed by humans and other animals.",
    index:1,
    ns:0,
    pageid:1164,
    pageimage:"Complex_systems_organizational_map.jpg",
    thumbnail:{source: "https://upload.wikimedia.org/wikipedia/commons/thu…p.jpg/50px-Complex_systems_organizational_map.jpg", width: 50, height: 50},
    title:"Artificial intelligence"
  },
  2142:{
    extract:"The following is a list of current and past, nonclassified notable artificial intelligence projects.",
    index:10,
    ns:0,
    pageid:2142,
    title:"List of artificial intelligence projects"
  }
}
Since now we have the pages for the searched query and we want to show those pages as results into the app. So we call the render(data) function and pass the result pages as a parameter to this function.
The render() function is not written yet so let’s add that into our code.
$(document).ready(function() {
  /* when form is submitted */
  $('.form').submit(function(){
    $('#res').html(" "); // set innerHtml of res div as blank
    callWikipedia();
    return false;
  });
  /* when search button is clicked */
  $('#search').click(function(){
    $('#res').html(" ");
    callWikipedia();
  });
  function callWikipedia(){
    var q = $('#query').val();
    var url = "http://en.wikipedia.org/w/api.php?format=json&action=query&generator=search&prop=pageimages|extracts&pilimit=max&exintro&explaintext&exsentences=1&exlimit=max&gsrsearch="+q+"&callback=?";
    $.ajax({
      url:url,
      type: 'POST',
      dataType: 'jsonp',
      success: function(result){
        var data = result.query.pages;
        render(data);
      },
      error: function(err){
        console.log(err);
        alert('Oops something went wrong! Please try again.');
      }
    });
  }
  /* render function to append the search result pages */
  function render(data){
    var pageurl="http://en.wikipedia.org/?curid=";
    for(var i in data){
      $('#res').append("<div id='resultdiv'><a target='_blank' href='"+pageurl+data[i].pageid+"'><h3>"+data[i].title+"</h3><p>"+data[i].extract+"</p></a></div>");
    }
  }
});
In the render function the passed argument ‘data’ is an object containing many pages.
The pageurl variable is the baseurl for each wikipedia page of searched query result.
We iterate through this passed data and each page inside the for loop has following 3 properties
pageid- the id of the wikipedia pagetitle- title of the wikipedia pagesextract- an extract from that result page.
We use these 3 properties from each pages and create a div with id resultdiv which contains an link to the wikipedia page id and link text is the title of the page.
And append that page to the div with id as res. And this way in each iteration of the for loop each page gets appended in the search results div.
If you noticed here that I am using for in loop instead of the for() loop.
That is because the variable data is not and array, it is an object containing pageid the key and an object as the property. It has many objects inside the data object. And to iterate through an object we use for in loop.
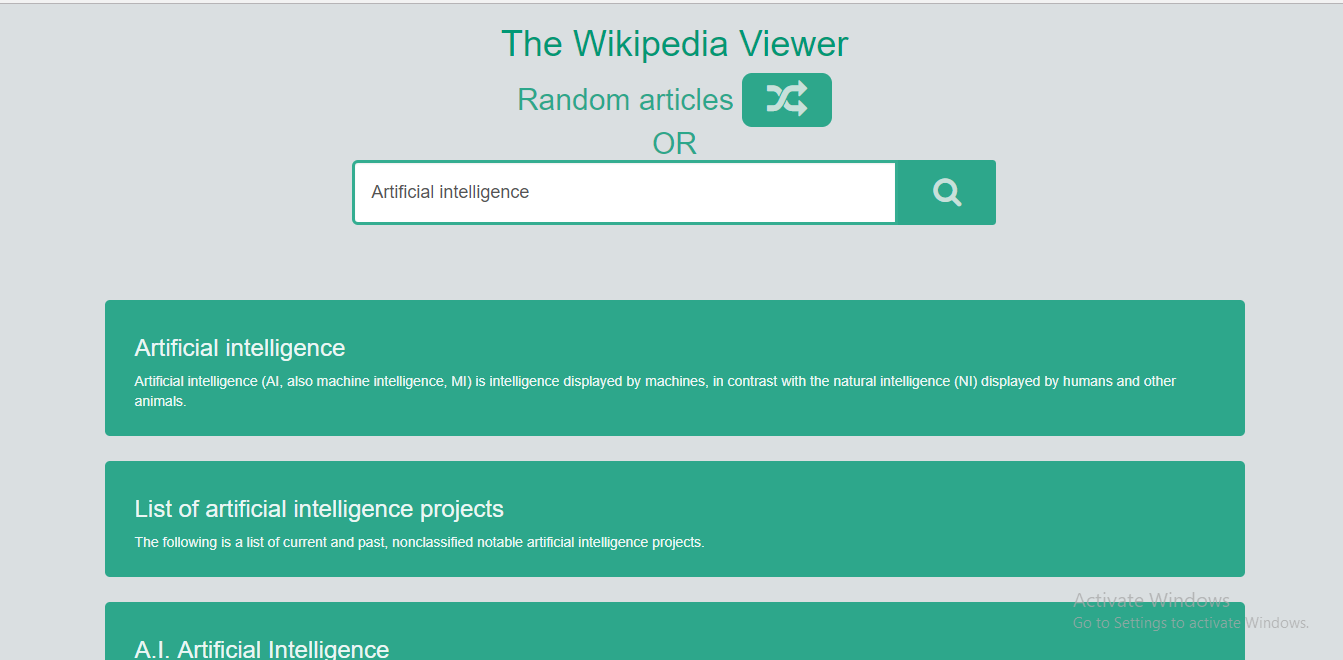
Now save the script.js file and refresh the index page. And type something into search bar and click search.
You will see the results as follows:
Feel free to give it your own touch and design the way you want.
And you completed the Freecodecamp Build a Wikipedia Viewer project.
Time for pushing code to Github and deploying it on github pages to make it live.
Deployment
If you have done the previous projects of HowToCoder weekly project series then you know this step very well and how to do it.
Let’s Push your code to Github
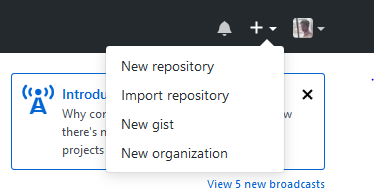
Now time to push the code to github repo. Go to github and create a new repository.
Fill up repository name and description. And click on “Create repository” button.
Copy the repository url. It will be https://github.com/<your-username>/<Repository-name>.git.
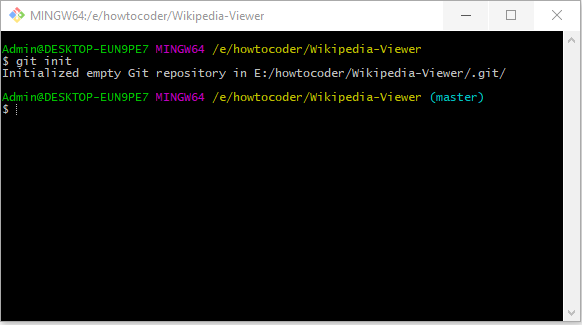
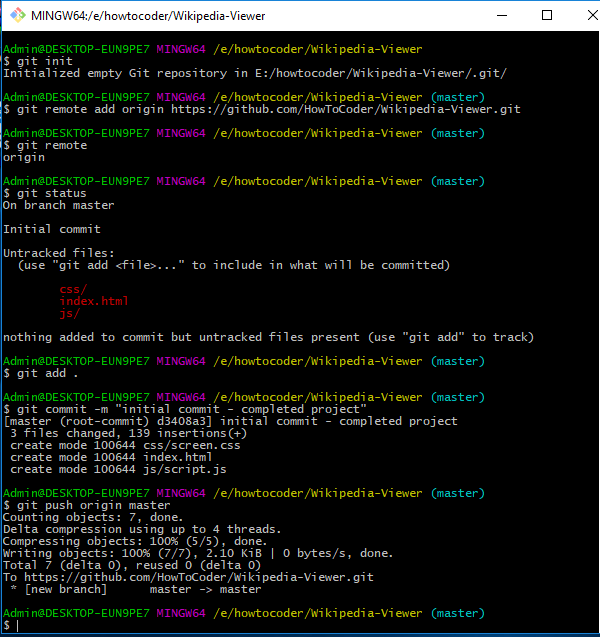
Now open git shell and navigate to your project folder. And type git init in github shell.
This command initializes the Directory as the repository. And you are now on the master branch of the repository.
Now you need to add a remote as your github repository. A remote is where code will be stored i.e the one you above copied.
Type git remote add origin https://github.com/user/repo.git.
Now type git status and it will show the untracked files.
You need to add these files and commit the changes.
Type git add . and it will add all untracked files, so time to commit the changes.
Type git commit -m "initial commit - completed project"
You have committed the files and now push it to the remote.
Type git push origin master. This command pushes the the code on the master branch to the remote named origin.
Now navigate to your repository on github and you can see your files there.
Let’s make it live on github pages
Go to Settings tab on your project repo page, scroll down to Github Pages section.
Select the source as your master branch and click save.
And as you click save you will see a message saying Your site is ready to be published at http://<user>.github.io/<project-name>.
And also click on the “Enforce https” to make your site available on https.
Now you can visit that url and see your project live. Yay :)
I’m So happy right now.
Conclusion
-
You successfully completed the Freecodecamp Wikipedia Viewer project.
-
You learned about how Ajax and APIs work. You used Wikipedia API.
-
You learned git and github and how to push your code to Github repository.
-
And how to deploy your project to github pages.
If you have any doubts or questions, write in the comments. I would love to help.
Let me know your thoughts on this in comment section.
Checkout the previous posts if you haven’t read
I’ll see you guys in the next project tutorial.
Did you find this article useful? Write your comments below.
If you found this article helpful, do share with your friends.
Let’s learn to code together. Thank you :)
