Building Freecodecamp Personal Portfolio Website Project
This is the 5th project part of HowToCoder weekly project series.
Checkout the previous posts if you haven’t read
Till now we have finished all 4 Freecodecamp Intermediate projects and all of them are live and now we have some projects to showcase to others.
So we will build portfolio website which will have all of our 4 previous projects in it. You can add any other projects that you have built.
Even if you haven’t done the previous projects to show no worries :)
You can always add more projects as you progress to keep your portfolio up to date.
As a Developer you should have a portfolio website as it helps to create your personal brand and an online presence to showcase your projects and experiences.
Doesn’t matter whether you have enough projects or you are just student or newbie. You can come back and update your portfolio later.
Are you ready ??
Alright then let’s do this!
Portfolio Project
The user stories are as follows:
- I can access all of the portfolio webpage’s content just by scrolling.
- I can click different buttons that will take me to the portfolio creator’s different social media pages.
- I can see thumbnail images of different projects the portfolio creator has built (if you haven’t built any websites before, use placeholders.)
- I navigate to different sections of the webpage by clicking buttons in the navigation.
The Portfolio will have following sections:
- Navigation bar - To navigate to different sections in page.
- About - To describe yourself.
- Portfolio - To showcase your projects.
- Contact - For people who want to contact you.
- Footer - To show your social media links.
How will it look like after the completion of this project?
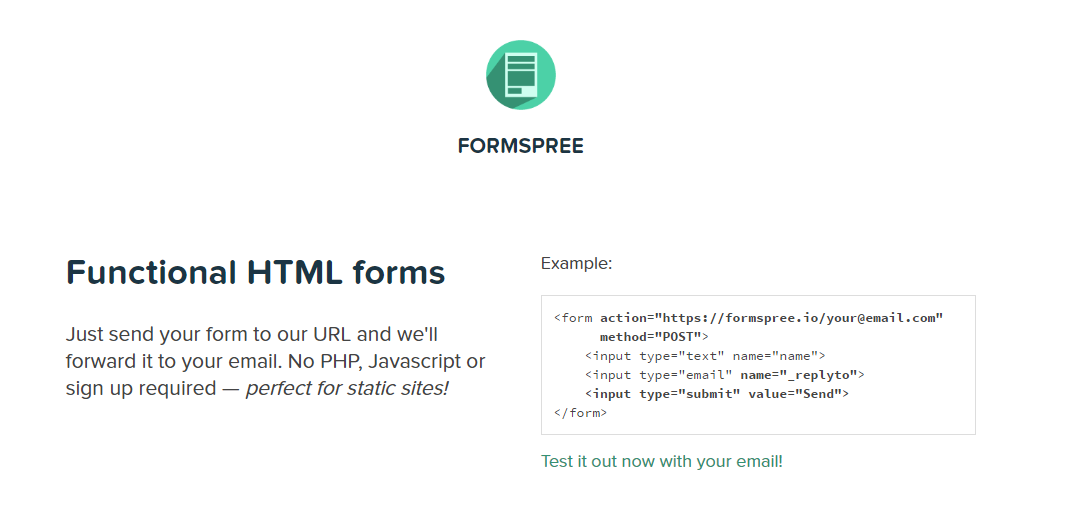
We will use Formspree to forward all the messages submitted from contact form of the portfolio.
Formspree allows you to do that so that you don’t have to write server side code to save the messages in database OR to forward it to your email address using server side programming language.
So we will be building a static website and add formspree in contact form.
Prerequisites?
Knowledge of HTMl & CSS.
Basics of Bootstrap but not mandatory, I will explain anyway.
Git bash shell installed. If not then install it from here
Don’t worry if you don’t know Bootstrap, it’s a css framework for responsive designs, you can use plain css for styling if you want.
So let’s start building it.
Project Setup
Directory Structure
--css/
----style.css
--img/
----<Your project thumnail images>
index.html
index.html
Open index.html and paste the following code.
<!DOCTYPE html>
<html lang="en">
<head>
  <meta charset="UTF-8">
  <meta name="viewport" content="width=device-width, initial-scale=1.0">
  <meta http-equiv="X-UA-Compatible" content="ie=edge">
  <title>Portfolio - HowToCoder a Software Developer from Mumbai, India</title>
  <link href="https://maxcdn.bootstrapcdn.com/bootstrap/3.3.7/css/bootstrap.min.css" rel="stylesheet"
    integrity="sha384-BVYiiSIFeK1dGmJRAkycuHAHRg32OmUcww7on3RYdg4Va+PmSTsz/K68vbdEjh4u" crossorigin="anonymous" />
  <link href="https://maxcdn.bootstrapcdn.com/font-awesome/4.7.0/css/font-awesome.min.css" rel="stylesheet"
    integrity="sha384-wvfXpqpZZVQGK6TAh5PVlGOfQNHSoD2xbE+QkPxCAFlNEevoEH3Sl0sibVcOQVnN" crossorigin="anonymous" />
  <link rel="stylesheet" href="css/style.css" />
</head>
<body>
  <!-- body of the page -->
  <script src="https://code.jquery.com/jquery-3.2.1.min.js"
    integrity="sha256-hwg4gsxgFZhOsEEamdOYGBf13FyQuiTwlAQgxVSNgt4="
    crossorigin="anonymous">
  </script>
  <script src="https://maxcdn.bootstrapcdn.com/bootstrap/3.3.7/js/bootstrap.min.js"
    integrity="sha384-Tc5IQib027qvyjSMfHjOMaLkfuWVxZxUPnCJA7l2mCWNIpG9mGCD8wGNIcPD7Txa"
    crossorigin="anonymous">
  </script>
</body>
</html>
This is the typical HTML strcuture, In above code we have added CDN links to bootstrap css and js files also a stylesheet by name style.css .
Just change the title of the page in title tag to whatever you want to keep.
Now we will be building the navigation bar first so add following code in the body of index.html
<body>
  <!-- part 1 -->
  <nav class="navbar navbar-fixed-top">
    <div class="container-fluid">
      <!-- Brand and toggle get grouped for better mobile display -->
      <div class="navbar-header">
        <button type="button" class="navbar-toggle collapsed" data-toggle="collapse"
          data-target="#bs-example-navbar-collapse-1" aria-expanded="false">
          <span class="sr-only">Toggle navigation</span>
          <span class="icon-bar"></span>
          <span class="icon-bar"></span>
          <span class="icon-bar"></span>
        </button>
        <a class="navbar-brand" href="">HowToCoder</a>
      </div>
      <!-- Collect the nav links for toggling -->
      <div class="collapse navbar-collapse" id="bs-example-navbar-collapse-1">
        <ul class="nav navbar-nav navbar-right"> <!--right aligned nav links-->
          <li><a href="#about">About</a></li>
          <li><a href="#projects">Projects</a></li>
          <li><a href="#contact">Contact</a></li>
        </ul>
      </div><!-- /.navbar-collapse -->
    </div><!-- /.container-fluid -->
  </nav>
  <!-- part 1 ended -->
</body>
This is the bootstrap navigation component with css class as navbar navbar-fixed-top and it will be fixed at top while scroling. And whenever you use fixed navigation bar you need to add padding-top: 70px; to html body so that the body of the page don’t overlap with the fixed navigation bar.
A bootstrap navigation component has 2 things, one is navbar headers and second is navbar links.
The div with class navbar-header is nav header containing a hperlink with class navbar-brand and it will appear at the top left corner of the navbar.
And after that we have div with class collapse navbar-collapse which contains and unordered list of navbar links to visit different sections on the page.
The href attribute of those nav links will be the css id of their respective div elements. It is called as jumping to other section of the page through hyperlinks.
Now open the page in browser and you will see navigation component with links.
Let’s add some css to override the navbar background colors. Add following code in your css/style.css file.
/* part 1 */
body { padding-top: 70px; }

.navbar{
  background-color: #2C3E50;
}
.navbar li a{
  color: white;
  font-weight: bolder;
  text-transform: uppercase;
}
.navbar li a:hover{
  background-color: #2C3E50;
}
a.navbar-brand{
  text-transform: none;
  color: white;
}
We added padding-top to body and changed the backgroud color of the navigation bar and also change the links to the navbar hyperlinks to white and transformed text to bolder uppercase.
Now open it in browser and you will see navigation bar like in following picture.

Now navigation bar is done and we will create the about section page. This will contain a center aligned picture and paragraph for describing yourself.
Continue in the index.html code add following code.
<!-- part 2 -->
<div class="container-fluid about" id="about">
<div class="row">
<div class="col-md-6 col-md-push-3">
<div class="picture">
<img class="img img-responsive" src="img/howtocoder.PNG" alt="howtocoder profile picture" />
</div>
</div>
<div class="col-md-8 col-md-push-2">
<div class="text-center">
<span class="page-title">HowToCoder</span>
<p>Hi, I am Premprakash Singh, a Software Developer from Mumbai, India.
I am a learner who loves to code and attending tech meetups.
I am a freecodecamper and a member of Chingu cohort as well
(Bearded Dragon June cohort & Chingu-voyage cohort) and
a newbie in open source development.
</p>
<p>I am currently working at Speedbox.
I mostly write Javascript and do Web development, both frontend and backend.
I am passionate about coding.
Besides programming i love to watch comedy movies and web series and spending time with my friends.
I explore different areas of technologies on weekends and love to attend tech meetups.
</p>
</div>
</div>
</div>
</div>
<!-- part 2 ended -->
In above code change the image src to your image and the paragraphs to describe yourself.
If you can notice that the outer container div has and id attribute as about which is href attribute of the navbar ABOUT link and wherever you are at the page if you click at the ABOUT in navigation bar it will take you to the ABOUT section.
The bootstrap grid devides the whole screen in 12 columns and the div containing picture is of 6 column (half of screen) with css as col-md-6 col-md-push-3. The class col-md-push-3 pushes the div to 3 columns right to make it at center.
The 2 center aligned paragraphs describing yourself cover 8 columns and is pushed 2 columns right to make it center with css classes col-md-8 col-md-push-2.
You can see the output in browser by refreshing your index.html page but it does not look good so lets add some css to change background color, text color and to give the profile picture a cirular border.
Add following css in your css/style.css file.
/* part 2 */
.about{
  margin-top: -22px;
  padding-top: 50px;
  padding-bottom: 10px;
  height: 100%;
  background-color: #18BC9C;
  font-size: 20px;
  color: #2C3E50;
}
.picture img{
  height: 300px;
  width: 300px;
  margin: 0px auto;
  border-radius: 50%;
}
.page-title{
  font-size: 2em;
  text-decoration: underline;
  color: #2C3E50;
  display: block;
  margin-bottom: 10px;
}
You can see above css code that i have added some margin,padding and changed background color and font color of the about section.
I gave the picture some height, width and border-radius of 50% to make border circular.
Now just refresh the index page in browser and you will see following changes in page.
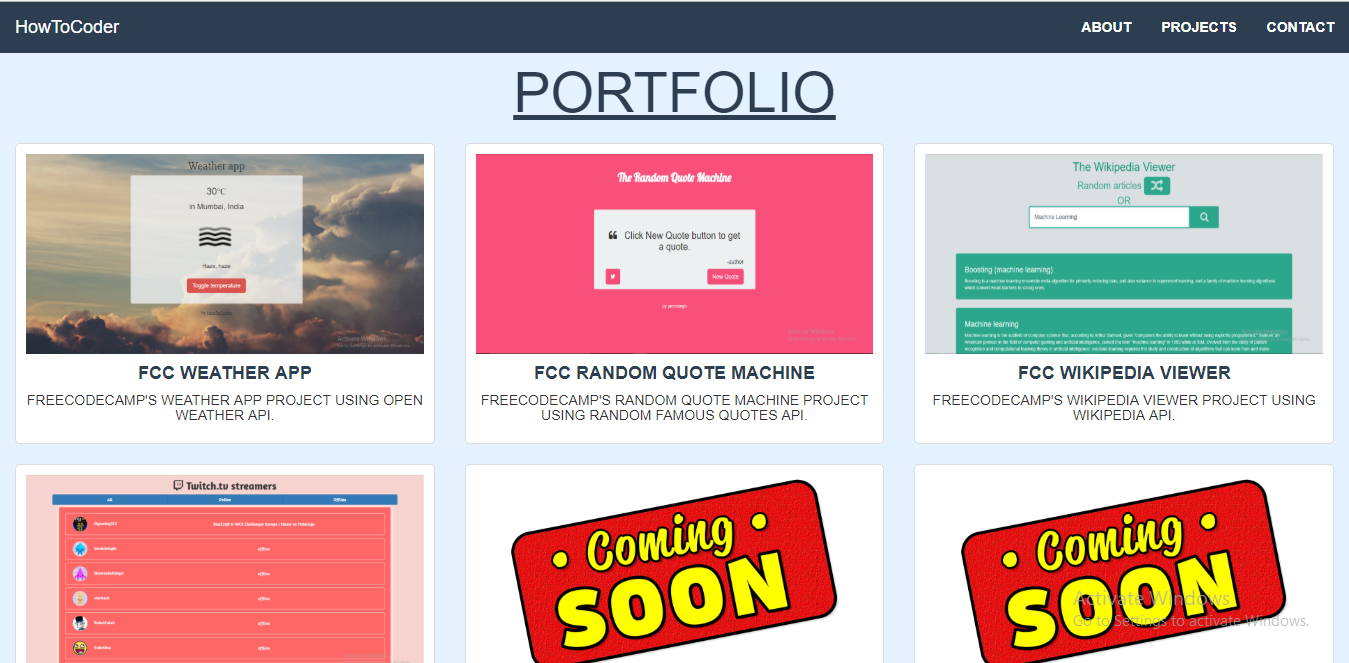
Now the about section is done so we will do the projects sections next. We will use the thumbnail component of bootstrap and will show 3 projects (3 column layout) in one row.
If you don’t have enough projects to show you can use place holder image like i will be using.
The thumbnail component has an image and caption and here the image will be the thumbnail of your project and caption will be the description of your project.
Now continue in the index.html file add following code.
<!-- part 3 -->
<div class="container-fluid projects" id="projects">
  <div class="text-center">
    <span class="page-title" style="font-size: 4em;">PORTFOLIO</span>
  </div>
  <div class="row">
    <div class="col-md-4">
      <div class="project-item thumbnail">
        <div>
          <a href="https://howtocoder.github.io/Weather-App/" target="_blank">
            <img src="img/weather-app.PNG" class="img img-responsive" alt="Freecodecamp Weather App Project">
          </a>
        </div>
        <div class="project-item-text">
          <h4>FCC Weather App</h4>
          <h5>Freecodecamp's Weather App Project Using Open Weather API.</h5>
        </div>
      </div>
    </div>
    <div class="col-md-4">
      <div class="project-item thumbnail">
        <div>
          <a href="https://howtocoder.github.io/Random-Quote-Machine/" target="_blank">
            <img src="img/Fcc_QuoteMachine.PNG" class="img img-responsive" alt="Freecodecamp Random Quote Machine">
          </a>
        </div>
        <div class="project-item-text">
          <h4>FCC Random Quote Machine</h4>
          <h5>Freecodecamp's Random Quote Machine Project Using Random Famous Quotes API.</h5>
        </div>
      </div>
    </div>
    <div class="col-md-4">
      <div class="project-item thumbnail">
        <div>
          <a href="https://howtocoder.github.io/Wikipedia-Viewer/" target="_blank">
            <img src="img/Fcc_Wikipedia.PNG" class="img img-responsive" alt="Freecodecamp Wikipedia Viewer">
          </a>
        </div>
        <div class="project-item-text">
          <h4>FCC Wikipedia Viewer</h4>
          <h5>Freecodecamp's Wikipedia viewer project using Wikipedia API.</h5>
        </div>
      </div>
    </div>
  </div>
  <div class="row">
    <div class="col-md-4">
      <div class="project-item thumbnail">
        <div>
          <a href="https://howtocoder.github.io/Twitch-Tv-App/" target="_blank">
            <img src="img/twitch-tv.PNG" class="img img-responsive" alt="Freecodecamp Random Quote Machine">
          </a>
        </div>
        <div class="project-item-text">
          <h4>FCC Twitch Tv App</h4>
          <h5>Freecodecamp's Twitch Tv App Project Using Twitch Tv API.</h5>
        </div>
      </div>
    </div>
    <div class="col-md-4">
      <div class="project-item thumbnail">
        <div>
          <a href="//howtocoder.com/" target="_blank">
            <img src="img/coming-soon.png" class="img img-responsive" alt="Coming-soon">
          </a>
        </div>
        <div class="project-item-text">
          <h4>Next Fcc Project</h4>
          <h5>Freecodecamp's Next Project coming soon.</h5>
        </div>
      </div>
    </div>
  </div>
</div>
<!-- part 3 ended -->
In above code change the hyperlinks(live project links) for project, project image urls and caption to whatever you want.
you can add more to the project description if you want.
The container div in above code has id attribute same as Navigation bar PROJECT link href attribute to jump directly on projects section when clicked.
Now refresh your index.html page and you will see your projects in 3 column layout. In my case i can see 2 rows containing total 6 projects.
Let’s add some css to make sure all the images have same height and change some background color and font size and font color.
Add following in your css/style.css file.
/* part 3 */
.projects {
  background-color: #E4F1FE;
  color: #333;
  padding-top: 50px;
}
.project-item {
  padding: 10px;
  border-radius: 5px;
}
.project-item a img {
  height: 200px;
}
.project-item-text {
  margin: 10px auto;
  text-align: center;
}
.project-item-text h4 {
  text-transform: uppercase;
  color: #2C3E50;
  font-weight: bold;
}
.project-item-text h5 {
  text-transform: uppercase;
}
Now refresh the index.html page and you will see following output.
Now the projects section is also done and let’s make the contact form section. We will be using formspree so you can read about them here.
You have to change your form action to https://formspree.io/your@email.com and replace your@email.com with your own email.
Continue in the index.html page add following code.
<!-- part 4 -->
<div class="container-fluid contact" id="contact">
  <div class="text-center">
    <span class="page-title" style="font-size: 4em;">CONTACT</span>
  </div>
  <div class="row">
    <div class="col-md-6 col-md-push-3">
      <form class="form" method="POST" action="https://formspree.io/your@email.com">
        <div class="row">
          <div class="col-md-12">
            <input type="text" class="form-control" name="name" placeholder="Name" required />
          </div>
        </div> <!-- Name ended-->
        <div class="row">
          <div class="col-md-12">
            <input type="email" class="form-control" name="_replyto" placeholder="Email Address" required />
          </div>
        </div> <!-- Email ended-->
        <!-- hidden fields -->
        <input type="hidden" name="_next" value="https://howtocoder.github.io">
        <input type="hidden" name="_subject" value="Portfolio - New submission!">
        <input type="text" name="_gotcha" style="display:none">
        <!-- hidden fields ended -->
        <div class="row">
          <div class="col-md-12">
            <input type="text" class="form-control" name="phone" placeholder="Phone Number" />
          </div>
        </div> <!-- Phone no ended-->
        <div class="row">
          <div class="col-md-12">
            <textarea name="msg" class="form-control" rows="5" cols="80" placeholder="Message"
            style="resize: none;" required></textarea>
          </div>
        </div> <!-- Message ended-->
        <br />
        <div class="row">
          <div class="col-md-12">
            <input type="submit" class=" btn btn-lg btn-success" name="submit" value="Submit" />
          </div>
        </div> <!-- Submit ended-->
      </form>
    </div>
  </div>
</div>
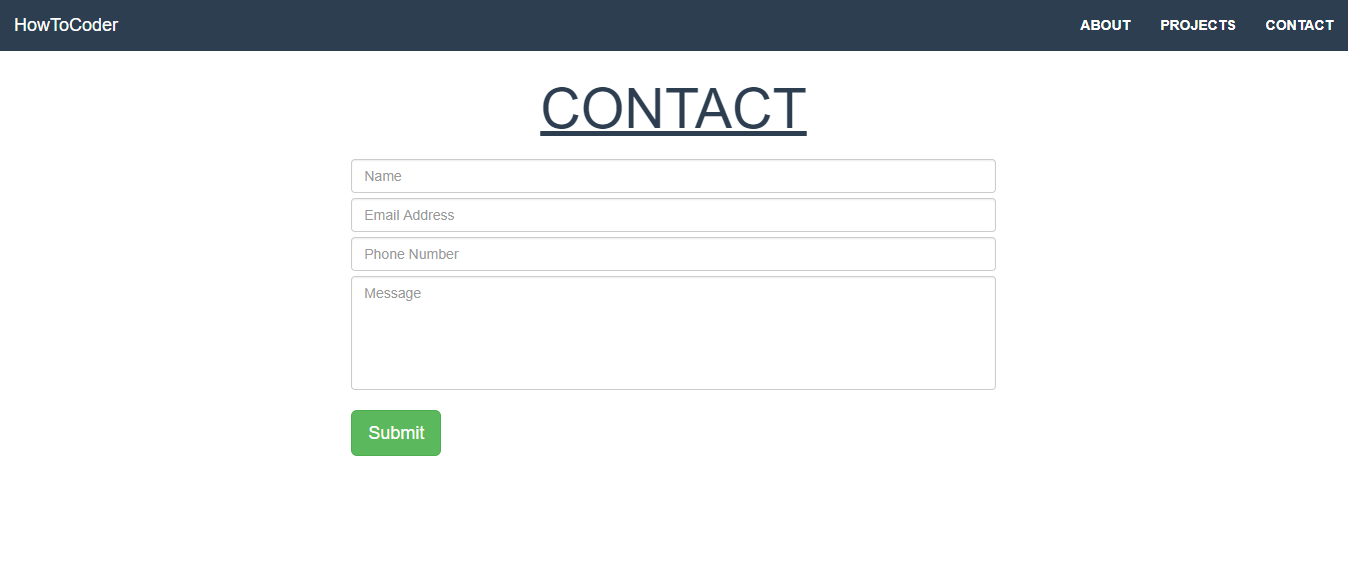
The form is a center aligned 6 column div container.
Don’t forget to change the email id in the form action. Above code contains bootstrap input fields for Name, Email, Contact(Optional), Message and Submit button.
You can see some hidden fields there which are required for formspree to add subject and other attributes in the email that you will receive.
Let’s add some css to add background colors and padding to it. Add following css code in css/style.css .
/* part 4 */
.contact{
  background-color: white;
  color: #333;
  padding-top: 50px;
  padding-bottom: 50px;
}
.contact input{
  margin-bottom: 5px;
}
I added some padding and background color to contact page also added 5px bottom margin to each input field.
Now just refresh your index.html page and you will see the following output.
Don’t try to submit the form at the moment because it needs to be verified for each hosted url you add formspree to. So wait and we will do that too in a moment.
Now the last thing is to add a footer at the end of the page to show your social media links. Let’s do it.
Continue in index.html add following code.
<!-- part 5 -->
<div class="container-fluid web">
<div class="row">
<div class="col-md-4 col-md-push-4">
<!-- <p></p> -->
<div class="link text-center">
<h3>Around the web</h3>
<a href="https://twitter.com/premp_singh" target="_blank">
<i class="fa fa-2x fa-twitter" aria-hidden="true"></i>
</a>
<a href="https://www.linkedin.com/in/prem-singh-a0921293/" target="_blank">
<i class="fa fa-2x fa-linkedin" aria-hidden="true"></i>
</a>
<a href="https://github.com/HowToCoder" target="_blank">
<i class="fa fa-2x fa-github" aria-hidden="true"></i>
</a>
<a href="https://medium.com/@premsingh" target="_blank">
<i class="fa fa-2x fa-medium" aria-hidden="true"></i>
</a>
<p>Copyright © 2018 By <a href="https://github.com/HowToCoder">HowToCoder</a></p>
</div>
</div>
</div>
</div>
In above code i have used col-md-4 col-md-push-4 so the div comes at the center and has width as 1/3rd of the page width.
I used font-awesome icons with css class fa fa-2x inside the hyperlinks to link to my respective social media links. Change it to your respective social media links.
Let’s add some css to it for giving it some height, padding, margin to make it look good.
Add following css code to your css/style.css file.
/* part 5 */
.web {
  margin-top: 100px;
  background-color: #2C3E50;
  color: white;
}
.web .link {
  height: 110px;
  margin: 0px auto;
  margin-top: 30px;
}
.web .link a {
  text-decoration: none;
  color: white;
  padding-left: 5px;
}
I added background color and made font color as white. Added some margin and height to each link css class and added 5px of left padding for each anchor tag in links.
Refresh the page and it will look like this.

Congratulations you successfully completed building Freecodecamp Personal Portfolio Project.
It’s time to celebrate!!
Wait not yet, we forgot something!
If you have read the previous fcc project articles from HowToCoder project series then you know what’s coming next.
Deployment!!!
Time for pushing code to Github and deploying it on github pages to make it live.
Deployment
If you have done the previous projects of HowToCoder weekly project series then you know this step very well and how to do it.
Let’s Push your code to Github
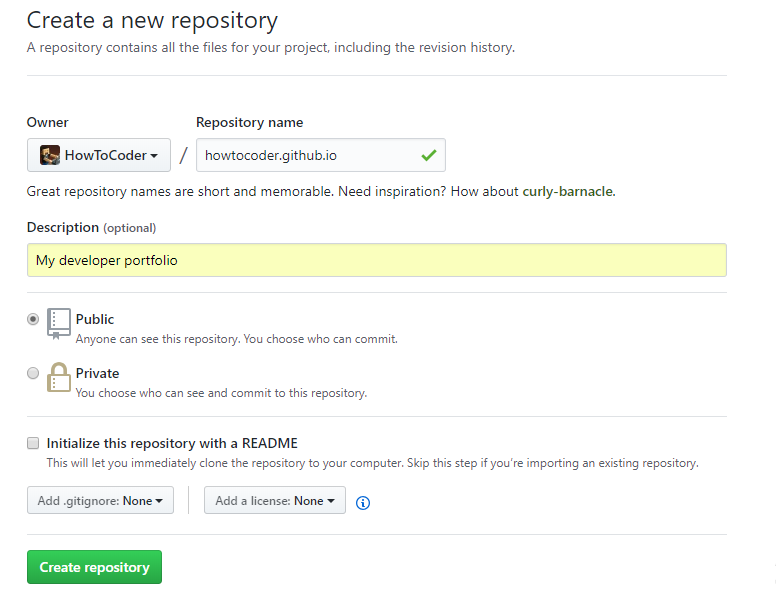
Go to github and create a new repository.

Fill up repository name as <YourGithubUserName>.github.io and description. And click on “Create repository” button.
Copy the repository url. It will be https://github.com/<your-username>/<Repository-name>.git.
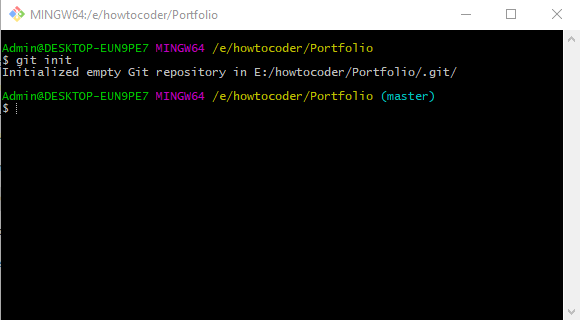
Now open git shell and navigate to your project folder. And type git init in github shell.
This command initializes the Directory as the repository. And you are now on the master branch of the repository.
Now you need to add a remote as your github repository. A remote is where code will be stored i.e the one you above copied.
Type git remote add origin https://github.com/user/repo.git.
Now type git status and it will show the untracked files.
You need to add these files and commit the changes.
Type git add . and it will add all untracked files, so time to commit the changes.
Type git commit -m "initial commit - completed project"
You have committed the files and now push it to the remote.
Type git push origin master. This command pushes the the code on the master branch to the remote named origin.
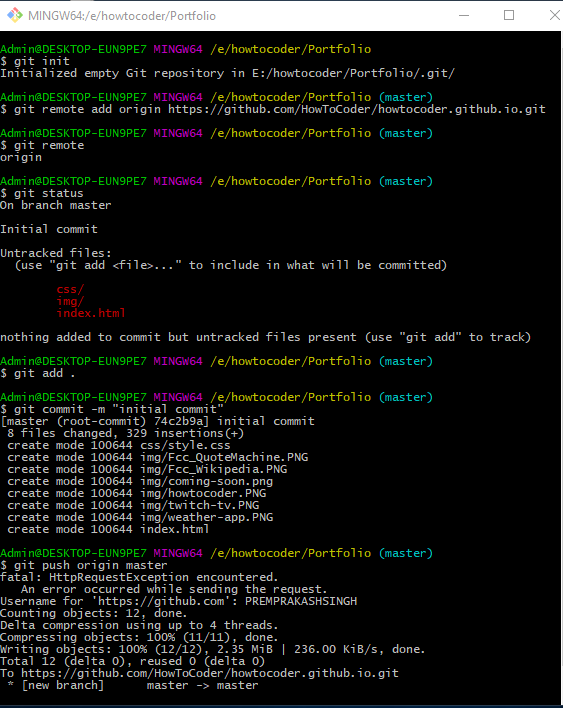
You can see a fatal HttpRequestException error during my git push in above picture, you can ignore that.
Now navigate to your repository on github and you can see your files there.
Let’s make it live on github pages
Go to Settings tab on your project repo page, scroll down to Github Pages section.
It should have already deployed your portfolio and you should see the live url of the portfolio there. But if not then follow the next instruction.
Select the source as your master branch and click save.
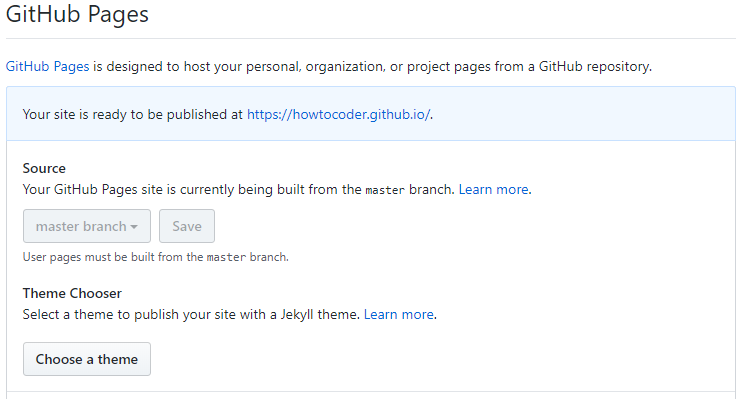
And as you click save you will see a message saying Your site is ready to be published at http://<user>.github.io/.
And also click on the “Enforce https” (If not checked) to make your site available on https.
Now you can visit that url and see your project live.
Yes!! It’s live Did it :)
Actually Wait..
We have to test the contact form and verify your email address (required only once) with formspree to receive the messages sent through contact form direactly in your email inbox.
You must be feeling like What ?? Still not done ?
Okay I am sorry don’t be so angry, just few more steps.
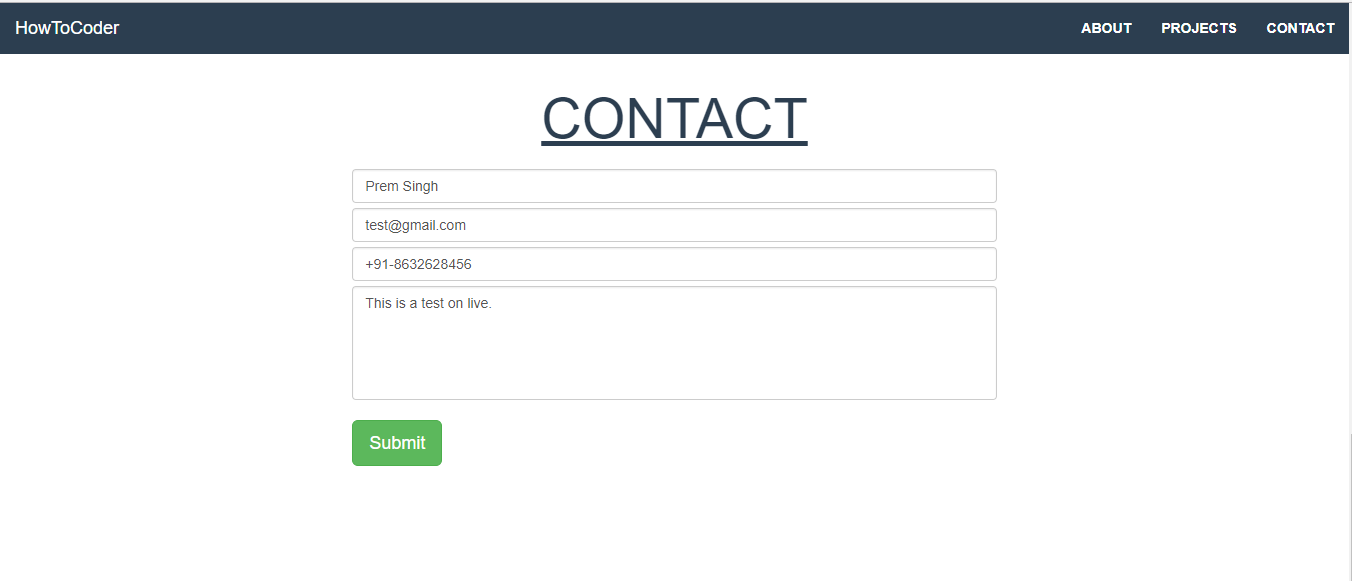
So go to your live portfolio’s contact form and fill it up like following image.
and once you click you will see following screen.
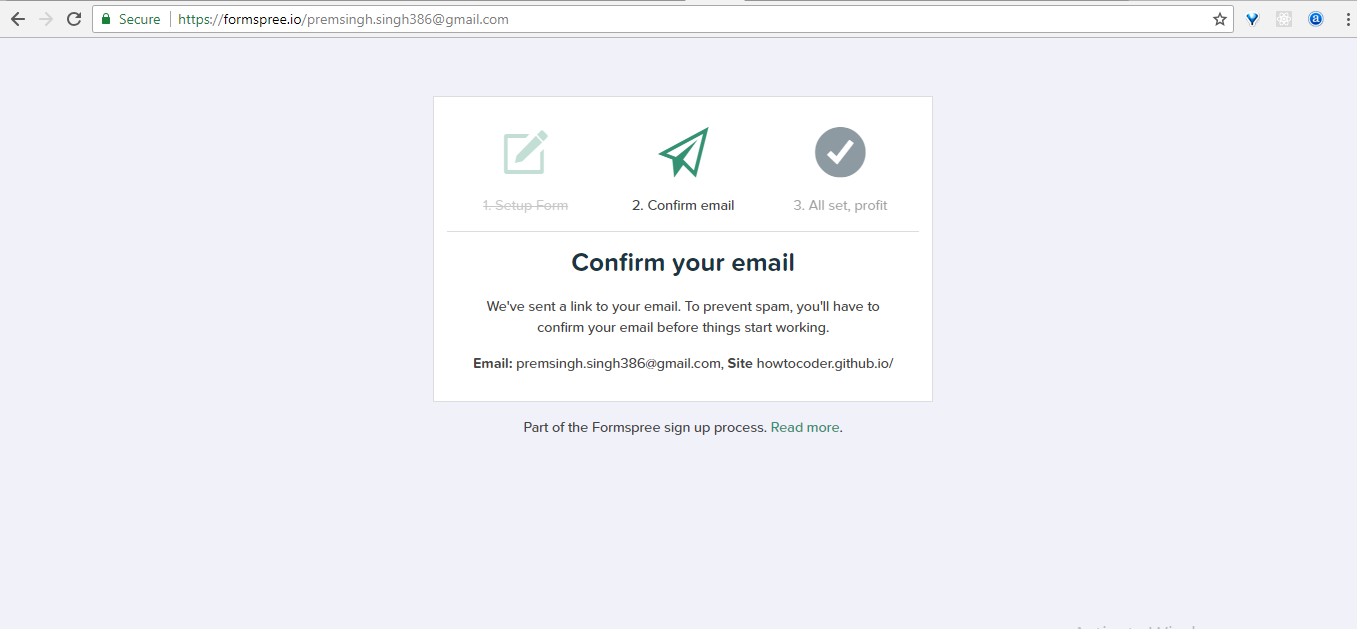
Now you must have received an email from formspree to verify the email address and website url.
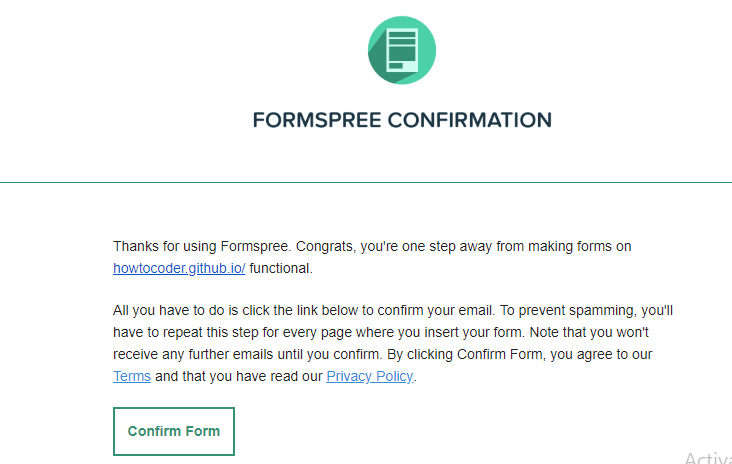
Just click on confirm and you will be redirected to following page.
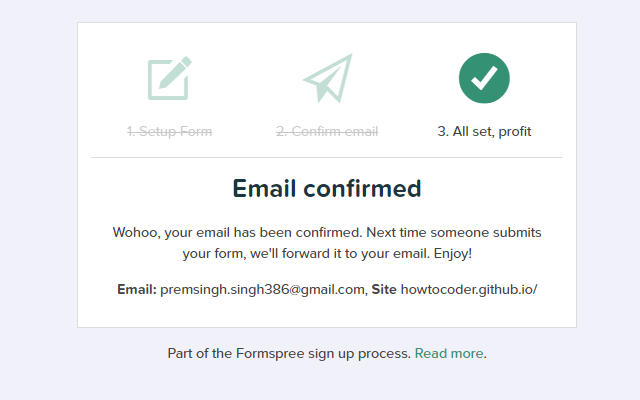
And it’s done that’s it. Now whenever someone sends a message they will see a “confirm you are not a robot screen” after they submit the contact form and then you will receive the message in your inbox.
Now It’s finally finished Yaay!!. This time like for real it’s done not kidding :)
If you have any doubts or questions, write in the comments. I would love to help.
Let me know your thoughts on this in comment section.
Checkout the previous posts if you haven’t read
I’ll see you guys in the next project tutorial.
Did you find this article useful?
Share you project in the comment with me a link to github repo and live url if you completed. And you can get feedback from others well.
If you found this article helpful, do share with your friends.
Let’s learn to code together. Thank you :)